---
title: "VMware - 4 CPU Deployment and Setup for NFV TWAMP"
slug: "vmware-4-cpu-deployment-and-setup-for-nfv-twamp"
tags: ["Assurance Sensor Control", "VMware", "setup", "NFV TWAMP", "VMware - 4 CPU Deployment", "sensor control "]
updated: 2025-07-31T19:00:04Z
published: 2025-07-31T19:00:04Z
canonical: "docs.crossworkassurance.cisco.com/vmware-4-cpu-deployment-and-setup-for-nfv-twamp"
---
> ## Documentation Index
> Fetch the complete documentation index at: https://docs.crossworkassurance.cisco.com/llms.txt
> Use this file to discover all available pages before exploring further.
# VMware - 4 CPU Deployment and Setup for NFV TWAMP
This section explains how to install the Cisco® Crosswork Assurance Sensor Control on a VMware ESXi Hypervisor so that you can complete the following tasks:
- Launch a Sensor Control instance on the appliance or server running the Hypervisor
- Configure access to the Sensor Control instance for management
- Discover the reachable Cisco Provider Connectivity Assurance Sensor Modules deployed in the network using the discovery instances supported by the controller via one of the network access ports
- Authorize the reachable Sensor Modules that are linked to the Sensor Control instance
- Use the Sensor Control to configure the Sensor Module or Cisco Provider Connectivity Assurance Sensor SFP as remote devices in the controller
- Monitor the traffic and activity on the linked Sensor Modules to ensure connectivity with them is maintained and that network traffic is going through them
- Activate or configure features supported by the Sensor Control release
Once you connect the Sensor Control to Sensor Modules, you can leverage NFV-based vCPE features to conduct a variety of tests described in the Sensor Control User Manual.
## Preparing the NFV Infrastructure Environment
The NFV Infrastructure (NFVI) environment must be prepared prior to installing the controller virtual appliance.
The procedure below describes the installation of VMware ESXi 6.5 to run the Sensor Control instance.
**To prepare the NFVI environment**
1. Power up the server and enter the BIOS settings; ensure that all the virtualization options are enabled and the server power management profile is set to maximum performance.
2. Boot from an external CD or USB storage medium with the appropriate installer for VMware ESXi. Keep in mind that some server hardware may require a custom VMware installer to support specific hardware (such as RAID controllers), check with your server manufacturer in case of doubts.
3. Complete the VMware ESXi installation per the given instructions.
4. Use the vSphere web client to manage the VMware ESXi server.
## Provisioning the Sensor Control using ESXi 6.5+
Use the vSphere client to load the Accedian provided *.ova file and start the Sensor Control virtual machine instance.
**To install the module on the server**
1. Launch the vSphere web interface.
2. Click the **Host ▶ Create/Register VM** button and follow the on-screen instructions.
1. Choose the **Deploy a virtual machine from an OVF or OVA File** option.
2. Enter the name of your choice.
3. Drag & drop the file from your PC onto the designated area or click & navigate to the *.ova file, then select it.
4. Set to **Thin** mode.
**CAUTION**: Do not accept the default setting **Thick**. Ensure that the virtual machine is deployed using **Thin** mode to limit the storage to the configured size.
5. Click **Finish** when done.
3. The system will inform you when the installation has completed. The installed Virtual Appliance will appear in the inventory on the left side of the page (the list panel). 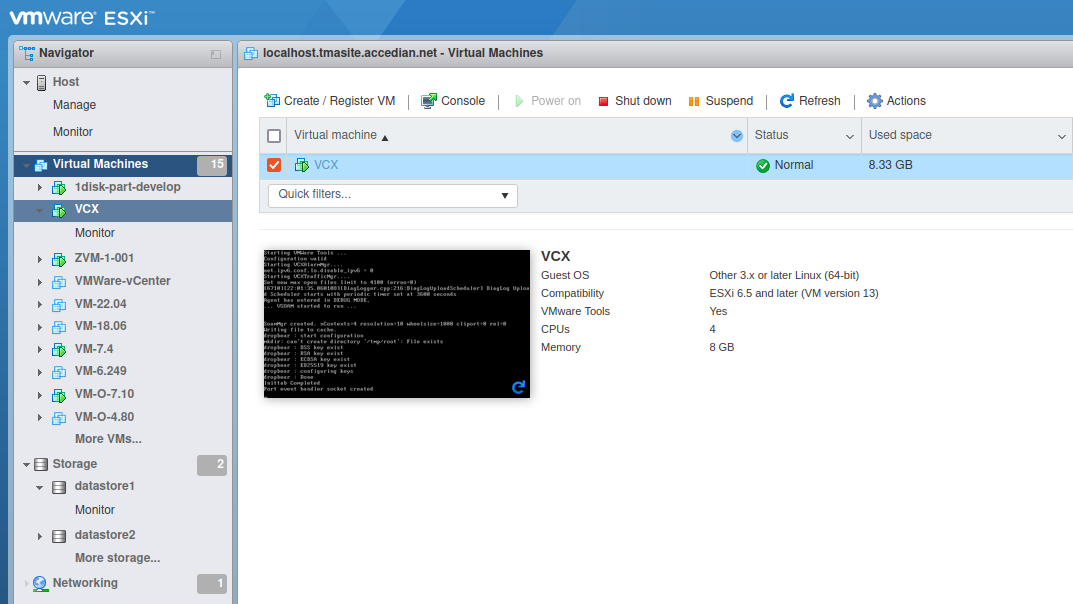
4. Click the Sensor Control virtual machine instance, ensure the VM is currently shut down, then choose **Edit** from the toolbar. 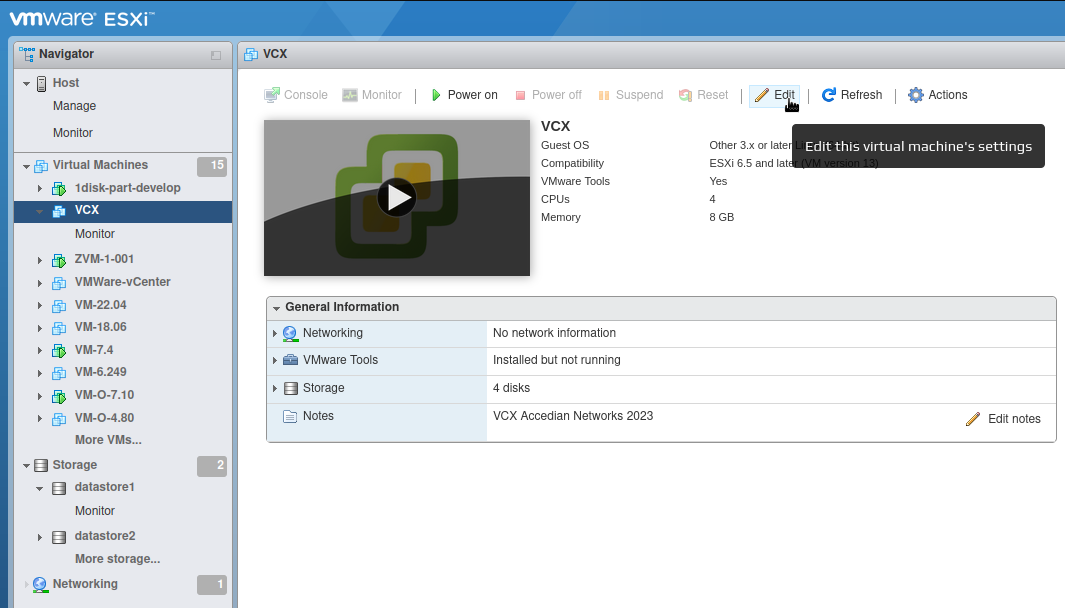
5. Review the Memory, CPU, and Network parameters. Adjust to your use case if required. For standard module management, the default values can be kept as-is. For NFV-PM uses cases, the following parameter configuration is required:
1. In the **Virtual Hardware** tab, set the following parameters:
- **CPU**: 4
- **RAM**: 8 GB
- **Reserve all guest memory**: Selected
- **Scheduling Affinity**: Select four cores to dedicate to the Sensor Control 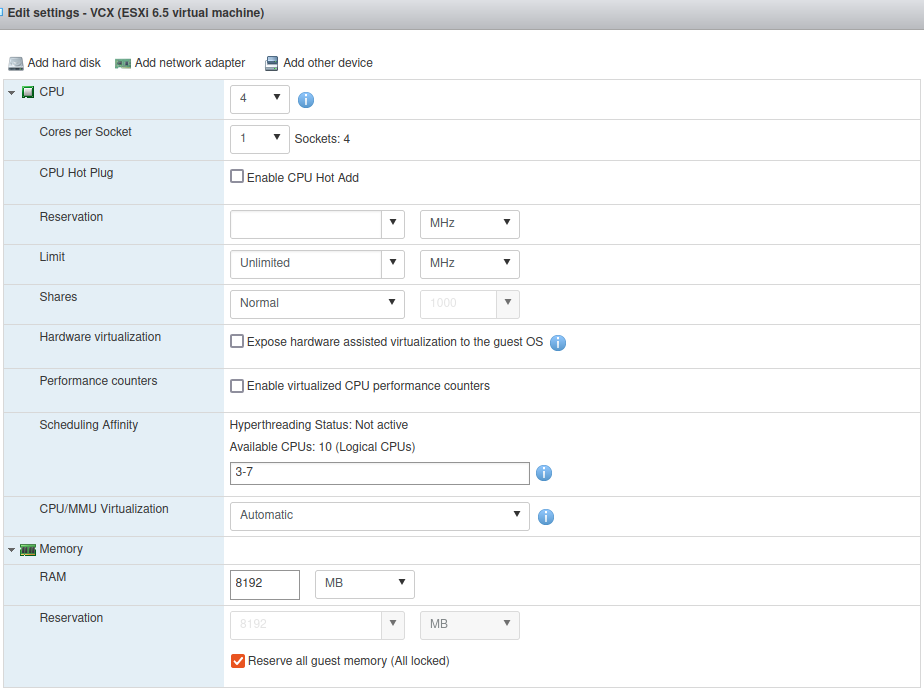
2. In the **VM Options** tab, expand the **Advanced** subsection and set the **Latency Sensitivity** to *High*. 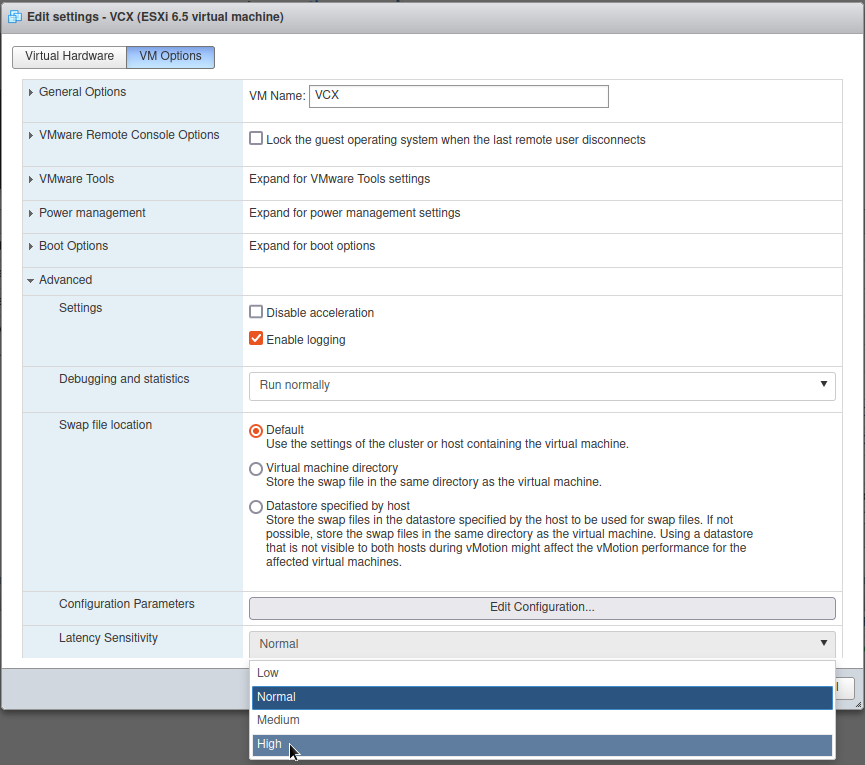
3. **Save & Close** the **Property** windows and return to the instance main screen.
6. **Power On** from the toolbar. A green triangle is superimposed on the Sensor Control icon to indicate it has been powered on.
7. To open the console to the Sensor Control, select the desired instance and click the **Console** button.
## Login to the Sensor Control virtual machine
**To Log in to the Sensor Control virtual machine**
1. Log in to the module when prompted. The name of the console (displayed in the menu bar of the window) is the same as the VM in the inventory.
2. A default IP address has been assigned to the application’s Management interface. You can use the CLI to assign a different static IP address to the application if needed by entering the following commands: login: admin
password: admin
interface edit Management dhcp disable
interface edit Management address < ip address > netmask < netmask > gateway < gateway ip >
interface show **Note**: Alternatively, you can use the CIDR notation to specify the netmask:
interface edit Management address < ip address >/< CIDR Mask > gateway < gateway ip >
- The default username is admin and the password is admin.
- The default IP address is 192.168.1.254.
1. If your Sensor Control virtual machine configuration connects the first virtual port to a VM Network that connects to a valid server NIC, you can access the instance by entering the IP address you assigned into your Web browser address bar.
2. Log in to the Sensor Control's Management Web interface when the Sensor Control page appears. The default username is admin and the password is admin.
3. Access the **System** tab for all standard management settings including:
- SNMP trap forwarding
- Remote syslog
- Date and time
**© 2026 Cisco and/or its affiliates. All rights reserved.** For more information about trademarks, please visit: [Cisco trademarks](https://www.cisco.com/c/en/us/about/legal/trademarks.html)[](https://www.cisco.com/c/en/us/about/legal/trademarks.html) For more information about legal terms, please visit: [Cisco legal terms](https://www.cisco.com/c/en/us/about/legal/terms-conditions.html)